
Once they’re fluent in simplifying algebraic expressions and solving equations in Algebra 2, students dive into another algebra area – solving inequalities. Children learn how to create equations and inequalities in one variable and use these to solve math problems.
To prepare you for success in your lessons on solving inequalities, we’ve compiled a few math tips in this article.

Read on to learn more!
What Is Solving Inequalities (Algebra 2)?
Explain that you’ll be solving inequalities in one variable. Provide an example of a simple inequality on the whiteboard. For instance:
2x + 6 ≥ 3x + 9
Explain that solving this inequality means having the x (or y or whatever variable is being used in the given inequality) on the left of the inequality sign and on its own. You can provide the solution to the above inequality to illustrate what it should look like:
x ≤ −3
Once x is on its own on the left, we say that we have solved the inequality. You should demonstrate this process step by step, but make sure to first review solving equations and also go through the properties of inequalities that children will use while solving inequalities.
How to Teach Solving Inequalities (Algebra 2)
Review Solving Equations
Solving inequalities is similar to solving equations, that’s why children will benefit from refreshing their knowledge on solving equations! Prepare worksheets with a few equations, such as 4x + 6 = 3x + 9, and hand them out to students.
This should be a brief activity in the form of bell-work that will help you identify whether some students are still struggling with solving equations and work on any identified gaps in their knowledge. You may also want to have a look at our article on solving equations.
Properties of Inequality
Now you can introduce the properties of inequalities. Children are already familiar with the properties of equality, so learning the properties of inequality should not be too difficult as the two bear many similarities.
Anti-reflexive property
The anti-reflexive property states that for any real number x, x is not smaller than x, and x is not greater than x. You can also present this on the whiteboard in the following way:
![]()
Anti-symmetry property
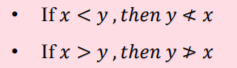
This property states that for all real numbers x and y, if x is smaller than y, then y is not smaller than x. Also, if x is greater than y, y is not greater than x. You can illustrate this on the whiteboard like this:
Transitive Property
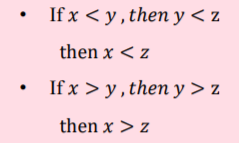
According to the transitive property, for all real numbers x, y, and z, we can say that if x is smaller than y, and y is smaller than z, then this means that x is also smaller than z. The same goes for the symbol of ‘greater than’. Illustrate this on the whiteboard in the following way:
Addition Property
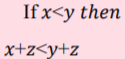
The addition property is a property whereby for any real numbers, x, y, and z, if x is smaller than y, then the sum of x and z is smaller than the sum of y and z. Illustrate this on the whiteboard in the following way:
Subtraction Property
According to the subtraction property, for any real numbers x, y, and z where x is smaller than y, if we subtract the same number from both sides of the inequality, the inequality stays the same.
![]()
Multiplication Property
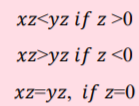
The multiplication property states that for all real numbers x, y, and z where x is smaller than y, if we multiply x and y by a positive number z, the inequality stays the same. If z is a negative number, the inequality swaps over. The same is true if x is greater than y. Present this on the whiteboard in the following manner:
If x < y, then:
Solving Inequalities (Algebra 2)
Now that students are familiar with the properties of inequality, you can proceed with the actual process of solving inequalities. You can demonstrate how we apply these properties while we’re trying to solve an inequality. Take an inequality, for instance:
- 3p – 7 < p + 9
Remind students that the aim of solving an inequality is to have the x (or p in this case) on its own on the left of the inequality sign. To achieve this, explain that you’ll use the subtraction property.
Remind them of the law of the subtraction property. By subtracting the same number from both sides of the inequality, the inequality stays the same. Then, apply this in the above inequality – to get rid of the p on the right side, we’ll subtract 1 p from both sides and the inequality will stay the same.
-3p – 1p – 7 < p – p + 9
– 4p – 7 < 9
Explain that to better isolate the p on the left, we have to get rid of the – 7. Point out that we’ll apply the addition property and add 7 to both sides of the inequality, which will leave us with:
-4p – 7 + 7 < 9 + 7
-4p < 16
Point out that the last step in managing to have p on its own on the left of the inequality sign is to get rid of the -4. At this point, students should have an idea of how to do this, so you can ask them if they can help out. Most likely someone will reply that you need to divide both sides by -4.
Make sure to remind students that since we’re dealing with a negative number, applying the property of multiplication or division means that we also have to swap over the inequality. That is, by dividing both sides by -4, we’ll get the following:
-4p ⁄ -4 > 16 ⁄ -4
So the solution to the inequality is as follows:
p > – 4
Feel free to also include additional stimulating material in your lesson, such as videos. For instance, this video by Khan Academy introduces different examples of solving inequalities with variables on both sides, as well as examples of drawing the solution on a number line.
In addition, once children feel comfortable with solving simpler types of inequalities.
you may also want to use this video by Khan Academy on solving compound inequalities.
Solving Inequalities Quiz
To practice some more, you can include a small quiz at the end of the lesson. As this is an online quiz, the only thing you’ll need is technical devices for each student, as well as a stable internet connection in your classroom.
Arrange students in pairs and explain that they will be solving a quiz to review the lesson on solving inequalities. Each player plays on an individual device. They’re presented with several inequalities and offered multiple answers from which they should choose one that fits as a solution for the inequality.
The players shouldn’t be able to see each other’s answers, so make sure the sitting arrangements are appropriate. Once both players finish, they compare their final scores. The person with the highest score wins the game!
Before You Leave…
If you liked the above math tips on solving inequalities (algebra 2), you’ll absolutely enjoy our lesson that’s dedicated to this! So make sure to check out our resources and worksheets on this topic:
- 1-4 Assignment (PDF)
- 1-4 Assignment SE (PDF)
- 1-4 Bell Work (PDF)
- 1-4 Bell Work SE (PDF)
- 1-4 Exit Quiz (PDF)
- 1-4 Exit Quiz SE (PDF)
- 1-4 Guided Notes SE (PDF)
- 1-4 Guided Notes TE (PDF)
- 1-4 Lesson Plan (PDF)
- 1-4 Online Activity (PDF)
- 1-4 Slide Show (PDF)
To get the Editable versions of these files, join us inside the Math Teacher Coach Community:
- 1-4 Assignment (Doc – Members Only)
- 1-4 Bellwork (Doc – Members Only)
- 1-4 Exit Quiz (Doc – Members Only)
- 1-4 Guided Notes SE (Doc – Members Only)
- 1-4 Guided Notes TE (Doc – Members Only)
- 1-4 Lesson Plan (Doc – Members Only)
- 1-4 Online Activity (Doc – Members Only)
- 1-4 Slide Show (PPT – Members Only)
This article is based on:
Unit 1 – Tools of Algebra
- 1-1 Properties of Real Numbers
- 1-2 Algebraic Expressions
- 1-3 Solving Equations
- 1-4 Solving Inequalities
- 1-5 Absolute Value Equations and Inequalities
- 1-6 Probability
Do You Need More Math Resources?
If you need guidance to structure your class, join us in the MathTeacherCoach community or head over to our blog – you’ll find awesome math resources for kids of all ages! Make sure to also sign up for our emails and get loads of free stuff!